Having given further thought to the possible options for this assignment and reviewed the subjects I used for the exercises, the garden gnome, the loaf and the statue, I have concluded that the best option with which to progress is the loaf. A mission to the supermarket allowed me to look at a startling array of loaves of many sizes, colours and textures, and without looking too much like a bread stalker while I was checking out the produce, I selected a moderately sized brown job with a nice seedy texture and rich colours .. !! Still got some strange looks though ..
The following post charts my progress through this assignment so far and looks at the options I selected, the lighting arrangements I used and the photographs I took along the way as possible contenders for final submission. At the time of writing I have not finally decided on which images I will put forward for assessment, and I still need to complete two more of the required elements of the assignment, but I wanted to record where I have got to at this stage.
I started the project with a pair of small constant lights, each with a 30 watt fluorescent bulb suitable for shots for small scale product photography, and a pair of Canon Speedlite flashes. After a while I got hold of a pair of larger lights, each with 6 fluorescent bulbs outputting a total of 1300 watts when both lights were operating with all bulbs lit. These gave the options of either using a 40cm silver ‘lampshade’ reflector or adding an 80cm softbox.
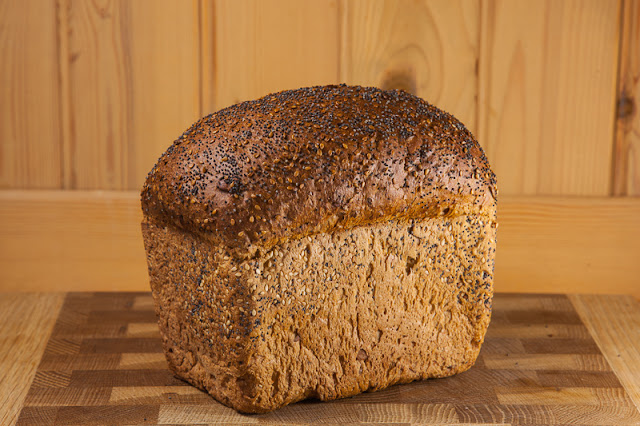
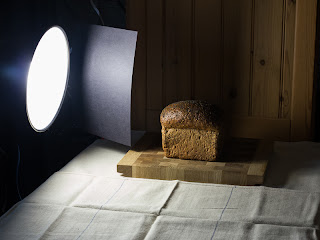
For my first shots using the small lights, I set up the loaf in front of a suitable wooden background and on a bread board as I decided that for the indoor shots I wanted to go for some nice warm tones as this suited the subject. The first shot I attempted was Form, where I needed to show the volume of the loaf and light it to show its 3D nature as well as possible. I set the lights up either side of the camera and at about 45 degrees to the loaf. The lights were about 40cm higher than the loaf and 1m away as shown in the image, and both had basic diffusers attached.
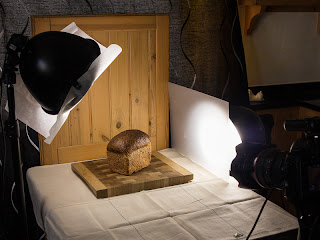 |
| Small light set up |
 |
| Form 1 |
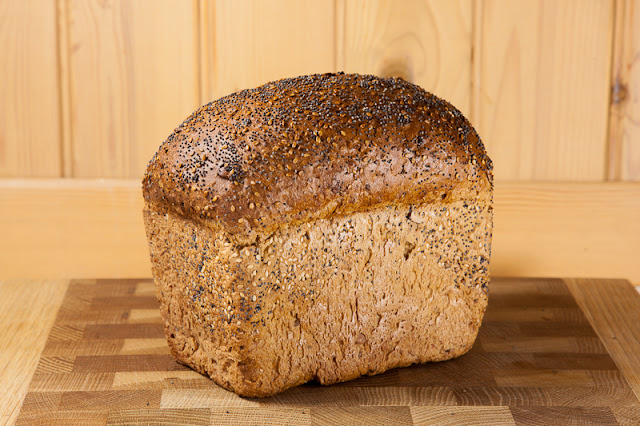
The elevation of the light ensured that there was a shadow below the loaf to enhance its 3D appearance and the positioning of the two lights on either side coupled with the angle of the loaf showed its depth. I selected a shooting angle that encompassed the top of the loaf to further add to the impression of its volume.
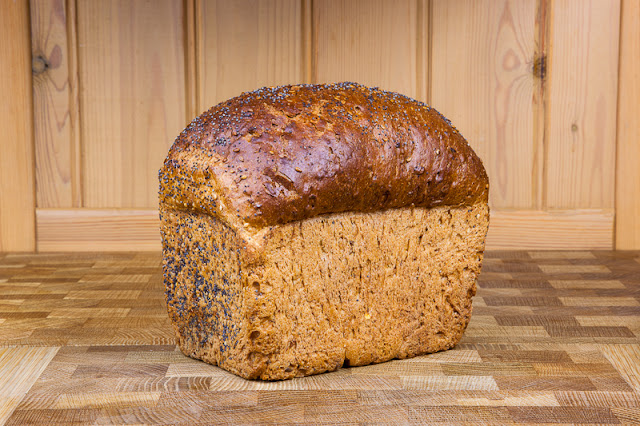
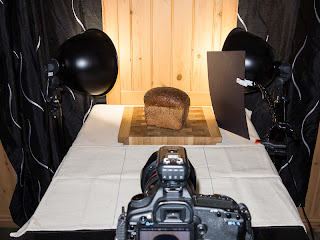
A subsequent effort saw me using one of the larger lights with the 80cm softbox attached and with the light position high up and slightly to the rear of the loaf as is shown in the picture. The softbox was angled very slightly towards the camera as this made it easier to get best use the white reflector I planned to use to fill the front of the loaf. Watching the impact on the lighting of the loaf on the screen, I slowly raised the white reflector which was positioned to the right of the camera and parallel to the front of the loaf until the shadow on the bottom had been opened up, but not so much that the shadow under the edge of the loaf had been affected – this was important as I wanted to retain that shadow to help with the definition of the volume of the loaf. I also held a black gobo in position to prevent light spill onto the back ground as I wanted to keep this reasonably dark and give the impression of light fall-off to add to the perception of depth – this gobo is not shown in the photograph of the setup as I don’t have three arms .. This second shot was the one that I selected for the assignment submission as I felt that it gave better definition to the loaf and rendered its volume more clearly.
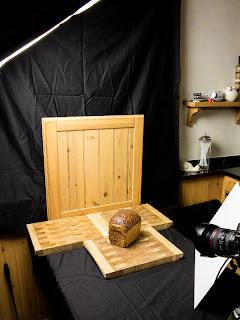 |
| Large set up - single light plus reflector |
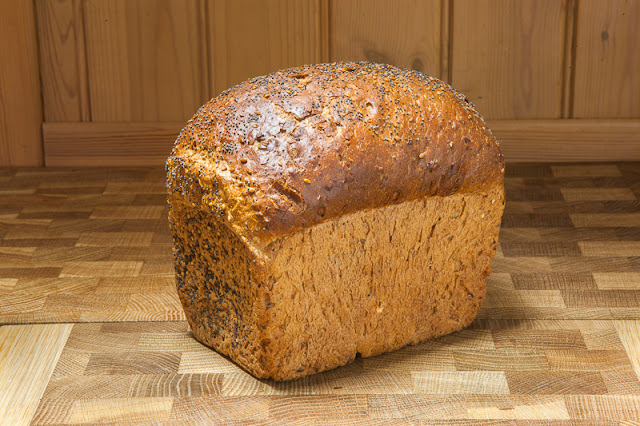 |
| Form 2 |
On reviewing these images for Form I think I need to get some more obvious shadow into the images to give a greater sense of depth, so will have a look at moving the lights further away to get a harder shadow and also moving a little further over the back of the loaf with the main light.
My second shot was intended to illustrate the Colour of the loaf and I did this with the lighting setup shown, using both my lights with diffusers attached to generate a soft lighting. I also underexposed the image by 1 stop to bring out the richness of the colours, although clearly I could have achieved the same effect in post-production if I had wanted to.
 |
| Colour 1 - small lights |
I had a second attempt at Colour using the big lights, and set the large softbox right above the loaf as I wanted the soft lighting benefits of as large a light source as possible in relation to the subject. I set the second light at a slightly greater height than the loaf and pointing directly at the front surface to light that to the same extent as the softbox was doing the top of the loaf from above. The resultant image gives a smooth and even light distribution and I dropped the exposure by 1EV to bring out the colours in the bread.
 |
| Colour 2 - big lights |
I wanted to explore at least one alternative light source and chose to look at candlelight, with a number of candles arranged around the loaf to best expose its shape and colour as shown in the image of the set up. I also wanted to get away from solely looking at the loaf so decided to add in a couple of small props to make more of a scene that I felt fitted the candlelight theme rather better. The candlelight introduced a really warm tone to the loaf as would be expected from its light emission spectrum.
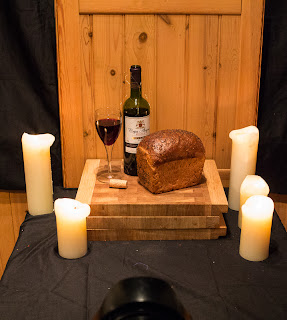 |
| Candle light set up |
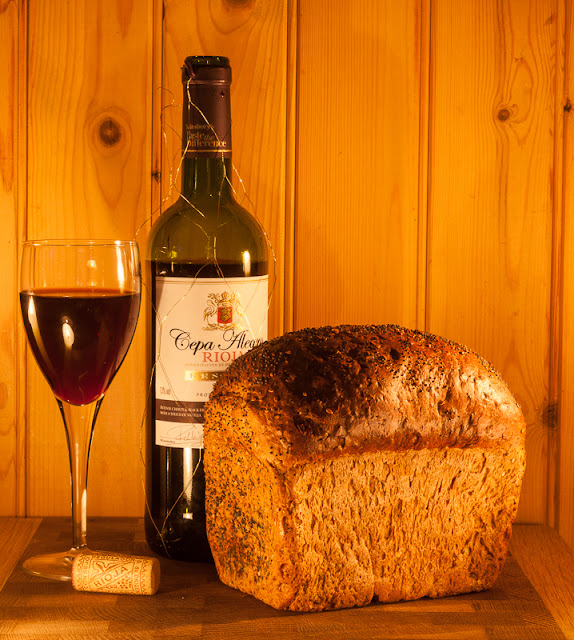 |
| Candle light - Colour 3 |
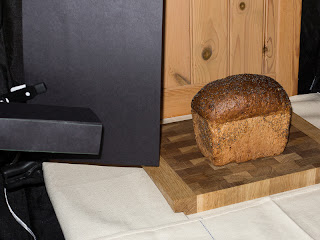
My first attempt at Texture was made with the constant light shining at an oblique angle across the front of the loaf and with a gobo moved around until it had blocked off the light from hitting the top and back of the loaf – I needed to create some small and hard shadows, so shot this with the naked light without the diffuser. I also swapped over to the Canon 70-200mm f/2.8 L IS lens and shot at 200mm so I could move further away and still zoom in close to the loaf to emphasise details, as the wider angle of the 24-105mm was seeing the light reflected from the gobo and giving flare. This could have been remedied with a gobo made from non-reflective material and I’ll do this before attempting this type of shot again, although moving to a greater distance with the 200mm zoom did remedy the situation. I felt that this was a successful image and I achieved the sharp surface definition I wanted to show in the texture on the surface of the bread.
 |
| Light and gobo setup for Texture |
 |
| Texture 1 |
However, I thought that I might be able to get a better effect if I used a flash with a modifier to direct and restrict the light, so set up the Canon 580 Speedlite with the 20cm black snoot attached and made some test images (again at 200mm) to get the direction and intensity as I wanted them. Although the snoot directs the light to a fairly narrow zone, I still found that there was a greater spread than I wanted, so again used a black gobo to keep light spill from illuminating the background or the upper parts of the bread. The flash was set to manual and adjusted to 1/8 power to optimise the lighting and the image illustrated the texture very well, although I did rather prefer the definition I got from the constant light as the fall off gave a more dramatic lighting that I obtained with the flash. I’m sure that with further tweaking I would have got more of a directional lighting effect from the flash, and I need to look more at other snoots and grids to try and achieve this.
 |
| Snoot and gobo setup or Texture |
 |
| Texture 2 |
I also used the larger lights for Texture and set up an undiffused 650w light at the same level as the loaf with the light beam raking across the bread to accentuate the texture by creating small and hard shadows. The light spread in my initial images was too broad so I called upon an able assistant to hold a couple of makeshift gobos to restrict the light to a narrow beam which picked out the details I wanted as shown below.
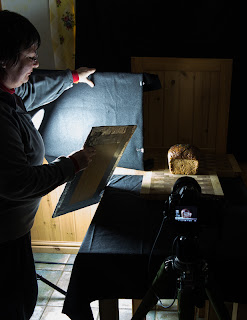 |
| Able assistant with gobos |
 |
| Texture 3 |
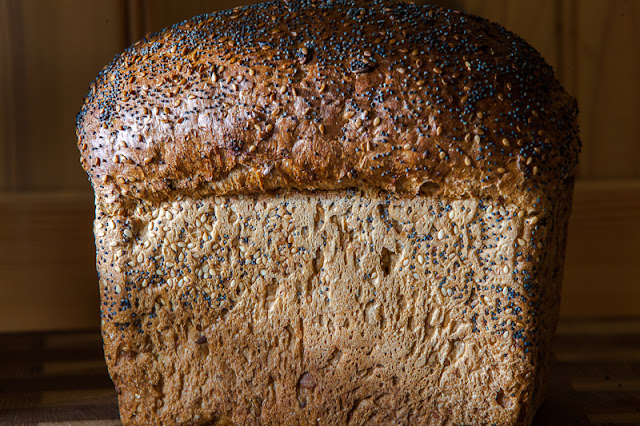
The texture of the loaf can be seen in even better detail when examined with the camera and lens moved closer and I took one more shot of the side of the loaf, which may well be a contender for submission.
 |
| Texture 4 |
The next shot was aimed at creating a backlit version such that Shape could be seen. Here it was necessary to light such that the outline of the loaf could be seen, but with minimal detail of the actual bread being visible. Both the small constant lights were placed behind the loaf and I found that I needed the gobo on the right hand light to prevent spill to the front of the shot. I underexposed by 1 stop and got the effect that I wanted. In the original file there is just a little detail in the front of the loaf, which is what I was after, but I suspect that by the time this appears on the blog, this will have been crushed out of existence! I took a couple of additional shots for Shape, and in both instances chose to have the loaf at a slight angle and positioned the gobo such that a little light was allowed to spill over onto the surface to accentuate the outline. I’ll need to think about which of these images serves the purpose better.
 |
| Shape with two small lights |
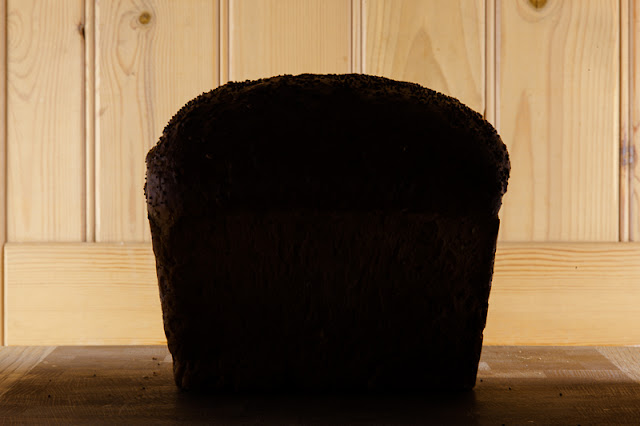 |
| Shape 1 |
 |
| Shape 2 |
Enthused with the big lights I set this shot for Shape up again with the un-diffused light set above and behind the loaf and aiming slightly forwards as can be seen from the shadow. I wanted to keep the direct light off the background so used a gobo again to tone this down whilst still allowing an attractive contrast between subject and background. This shot, at least to me, gave a more pleasing definition of the shape and this will be the image put forward for assessment.
 |
| Shape 3 - big lights |
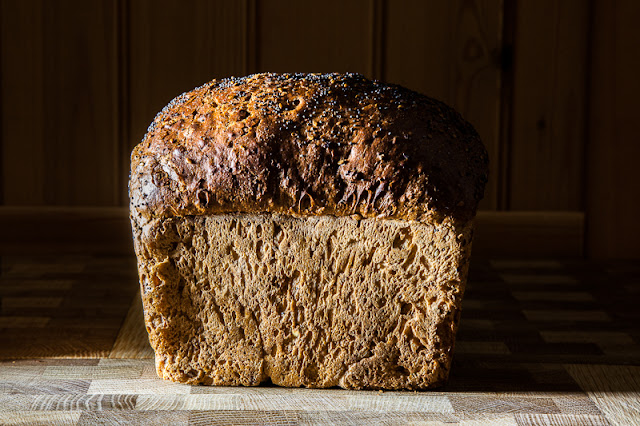
My intention was to take some of the eight required images outside using natural light. The first of these was taken on a day with a lot of high cumulus cloud providing excellent soft and diffuse light which was perfect for producing a shot to highlight the Colour of the loaf. This image has not been manipulated post-production and illustrates the beauty of natural light in bringing out the best in a subject.
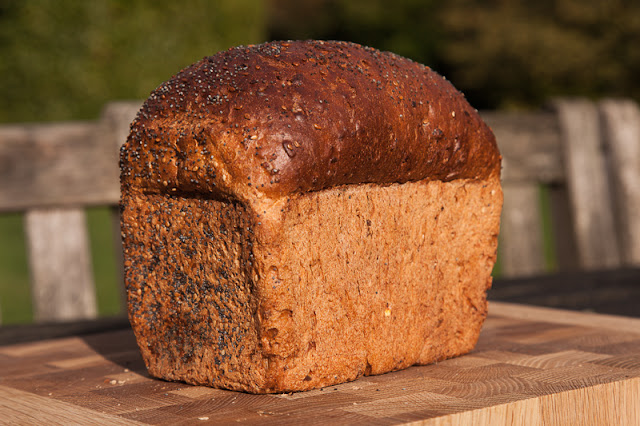 |
| Colour 4 - outside |
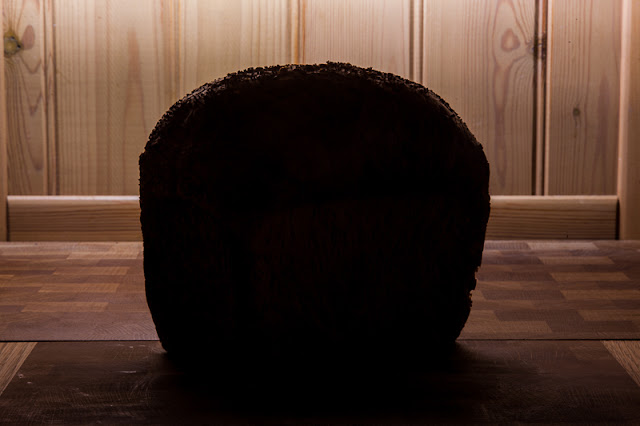
The day provided a range of different lighting opportunities as the clouds passed across the sun and I took advantage of a sunny spell in the late afternoon to use the low and bright sun to produce a natural light image for Shape. It was getting close to tea time, so I took a knife and some butter with me .. Shapes are best defined when they are contrasted with the background as I did for the indoor shot, but in this case I tried to set it up such that I could show the shape of the dark loaf against a dark background by taking advantage of a rim lighting opportunity with the sun behind.
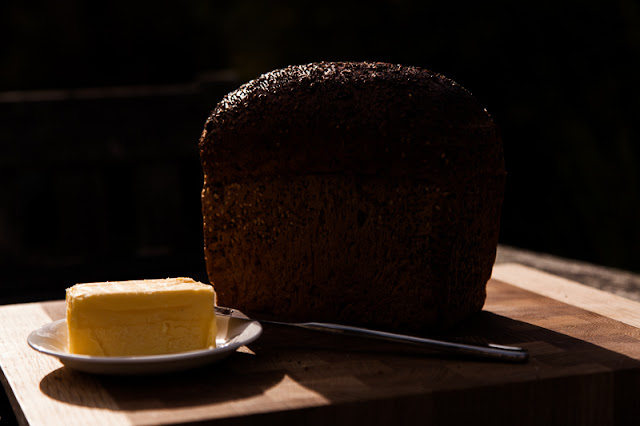 |
| Shape 4 - outside |
Light is a challenging assignment for several reasons. Firstly, indoor lighting is not an area of photography that I have explored very much in the past so I was starting pretty much from scratch, although once I had fabricated some basic light modifiers to add to my two constant lights and couple of flashes and done some experimentation, I was pleasantly surprised how relatively easy it was to get close to the lighting I had in mind. I shot tethered to a laptop for most of the time and was able to adjust the lights to get the effect I was after as I went along and before each shot. I found the constant light far easier to use than the flashes as the changes in lighting could be observed in real time; although the flashes do have modelling lights it is not that easy to use them to judge what became some quite tight angles, especially when shooting texture and form.
My second challenge was around the selection of subject material and I was never really sure that the loaf was the right choice even though it was a good candidate for form, texture, shape and colour and was indeed my tutor’s suggestion. I had always assumed I would do this with something more original and colourful, but then faced with obviously unlimited choice, I failed to make one, so went with the loaf! I think the exercises gave some good signposts in how to achieve the objectives of the assignment and Hunter el al (2011) is an outstanding accompanying text. I am starting to feel quite confident in setting up the shots after initial experimentation and found that I am getting faster at reading the situation and getting my first approximation of where to place lights, diffusers, gobos and the camera fairly close.
On the technical front, I think the bigger lights are a great success and reduce the need for insanely slow shutter speeds as well as their being such a large light source when brought close to the loaf and giving such soft shadows.
There are more shots to be taken and final submissions to be selected, but I'm reasonably happy with how this is going at the moment, so that's it for now ....
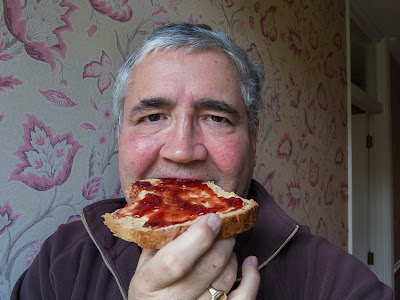 |
| That's it for now ..... |


It's a good job I've eaten because I'd be fancying a slice as well!
ReplyDeleteLoving that last shot!!!
ReplyDeleteWorking with food before lunch was not a good plan ... I'm beginning to lose confidence with the loaf and that I have captured the essence of what I'm trying to achieve with lighting. I'm not sure any of these really work at the moment ..
DeleteI think this works really well - and I also love the final shot!
ReplyDeleteSeriously I think you have produced a good, and surprisingly interesting, take on something we look at every day. This is an assignment that can be revisited until you drive yourself mad (I did). There really isn't much to be gained by redoing it endlessly and sometimes it's best just to send it in and then take up any learning points once you have achieved some distance.