Showing posts with label 4 Light. Show all posts

Saturday, 8 December 2012

Exercise 35 : Outdoors at night


The objective here is to explore the variety of lighting effects and colours in artificial light at night.  The recommendation was to use a city location for these images, but I took a different option and looked at a variety of situations built around what I was able to shoot on a couple of recent work trips to sites in Germany and Switzerland.  As I was on the move I took all the images with the Canon G1X rather than the usual 5DMkii for ease of transportation.  The locations suggested were floodlit buildings, brightly lit store fronts, large interiors and elevated views of roads where light trails could be captured.  The last of these has not been done at the time of writing and this will be added over Christmas when I hope to get some time to stand around on a motorway bridge in the dark for a while!

As I took these images whilst travelling I did not have the option of a tripod, so either used a remote release with the camera propped on a suitable surface or increased the ISO setting and shot with the largest aperture to get a sensible shutter speed.  The G1X gives good image quality at up to ISO1600 at least and the zoom lens goes to f/2.8 at the widest angle, so sensible shutter speeds of at least 1/40sec were maintained throughout.

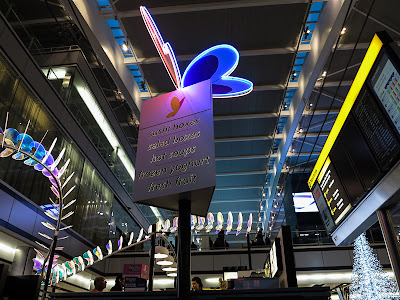
The first shots of interior spaces were taken at my second home of Heathrow Terminal 5 and shows bored people waiting for action.  However, as far as lighting goes, the curved structural beams in the roof are lit along their complete length by separate spotlights and obviously there is light from the shops, signs and even a seasonal Christmas tree to complete a scene of mixed light sources and colours.  The second shot was chosen because of the variety of different light types including the neon sign, the departures board and the LED lights that illuminate the cunningly crafted fishbone that runs round the sushi bar.  This shot contained quite a variety of different colours and I felt worked well against the darkness of the roof.
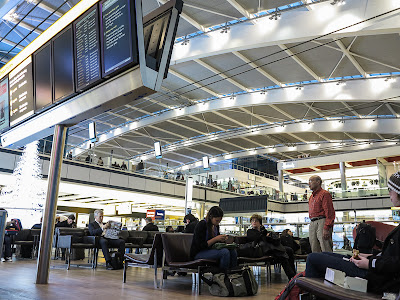
Interior lighting 1
Interior lighting 2

I took a third shot of a building where I work and went for an elevated position looking down into the body of the seating space.  The large fluorescent doughnut lights dominate the scene and make an interesting contrast with the circular and rectangular tables below which they cause to be illuminated with a very flat light.  I really liked this image because of the shapes more than the lighting.
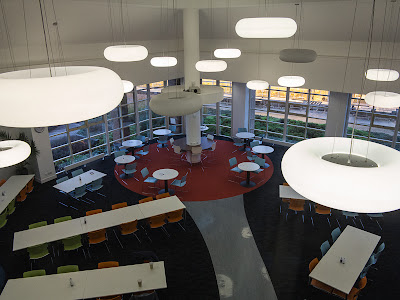
Interior lighting 3

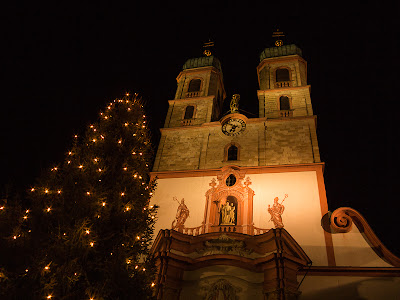
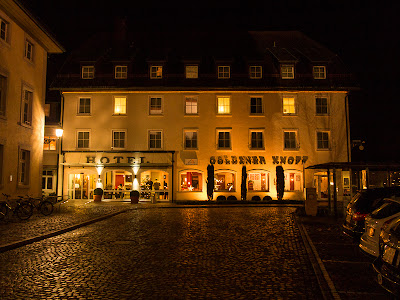
The first of my floodlit examples is of Brighton pier and is a shot I took during the OCA study visit to the Biennial a couple of months ago.  The camera was placed on a bench and the timer used to get a stable shot, although the very strong wind vibration has compromised image quality a little due to the 10 second shutter speed.  My second floodlit shot depicts an old church in the town of Bad Sackingen in Germany and provides an example of where a building is floodlit by lights that are out of view (this is specified in the course notes).  The lights are obviously at the bottom of the front elevation of the building and the light fall off is clear as you look up, but the two golden orbs on top of the towers are picked out as they are actually separately lit by spotlights from the roof of a neighbouring hotel.  The tungsten lights on the Christmas tree complement the lighting of the church itself and the whole photograph is reproduced as the lighting really was and imparts a warm glow to the brickwork and sharp definition against the night sky.  The final shot of external floodlighting is a small hotel, also in Germany, and I selected this because of the mixed tungsten and fluorescent lighting inside, coupled with the influence of the floodlights which are obscured behind the shrubs.  I liked the warmth of the scene as well as the reflections picked out in the wet cobbles and on the row of parked cars to the right.
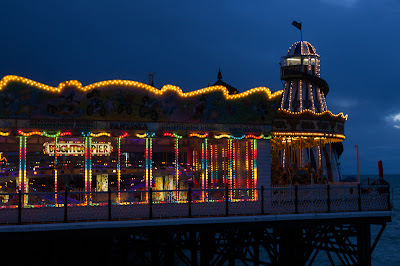
Exterior lighting 1
Exterior lighting 2
Exterior lighting 3

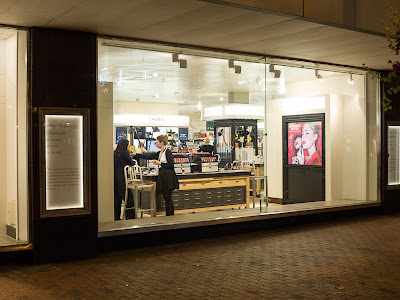
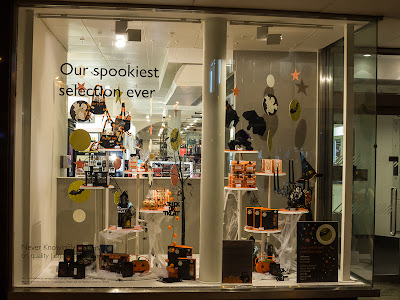
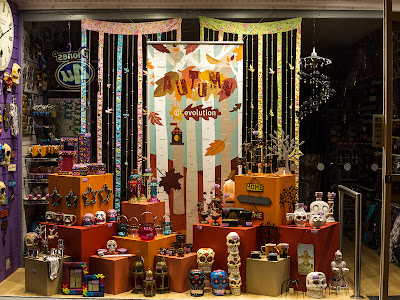
Shop were an interesting subject as there is far less lighting around than I thought there would be when I set out to do this.  There is much muted lighting, but little of the bright lights I was expecting to find (maybe I don’t go shopping at night often enough !).   Marks and Spencer and John Lewis provide two of the shots and the other pair was taken around Halloween.  Shop fronts in shopping centres were certainly more brightly lit but were also subject to various photographic restrictions, so I settled for the outside high street shops where I could just shoot from the road.  What did strike me about the shop shots was that the lighting strategies were not only quite muted as I said before, but also that lighting sources were mostly well concealed.
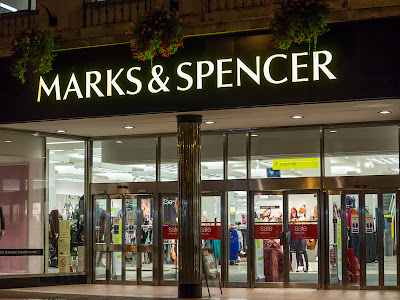
Shop front 1
Shop front 2
Shop front 3
Shop front 4

This exercise took some while to complete and I still need to photograph some car light trails if I get the opportunity.  I deliberately went for as wide a range of lighting scenarios as I could and was pleasantly surprise by the outcome given that I was in the territory of some more extreme camera settings than I have usually experienced in the past.  There were many opportunities to capture various lights and colours and I will certainly hope to expand on some images of this type in the future as I need to get away from my obsession with natural light and putting the camera away as soon as it gets dark!

Sunday, 2 December 2012

ASSIGNMENT 4 : Tutor feedback and response

Feedback on the Light assignment has been received and I am very pleased with the response.  The summary comments were ….  “The volume of work for my assessment is evidence of your application and it is considerable, but the logical layout makes my task much easier.   The ground you have covered in this assignment and in your exercises may be a new experience for you but it will prove a great benefit in your future work and a solid base on which to build.   I am impressed by the array of lighting equipment which you employed on this assignment and the experience you gained on the RPS workshop.   I don’t think there is any other way to become acquainted with studio lighting than ‘hands on’.   It seems that Chris Burfoot gave you some good grounding in the basic techniques.    I don’t know if you have flash meter yet but I would certainly recommend the purchase because I could not possibly manage without one.   I have found your ability to articulate your work lucid and extremely interesting which has made my task enjoyable.   You images are sharp, well framed and clearly presented.”  I am going to need to reshoot a couple of the images and in view of the conditions outside, will probably have to drop the ambition to have one natural light shot for each example, but there was no instruction in the brief to do that, so nothing will be lost there.

 
There were some specific comments on individual images and these are dealt with below.

For ‘Shape’ the feeling was that “This image certainly succeeds in demonstrating your subject’s basic shape but I feel that there is a too pronounced fall off in the illumination of the background probably because the light source was a little too close to the background.”  Having looked at this again, this is absolutely right and I have repeated this shot with one of the large lights behind the loaf, but this time allowing less of a gradient in light between the subject and the background and the following image is now the one I will submit in February for assessment.


The second Shape image was the one taken outside under natural light and either needs replacing or reshooting.  The view was that “the loaf is so heavy that it merges with the background and I am sure that you will be able to relieve it before you send your work for assessment at the end of the course.   It is only a minor point but as you have used two side elevations could you perhaps make one image of the end elevation?”  I had a lot of trouble with this one in that I was happy with the original image on screen, but the definition of the edge of the subject seemed to be affected by compression for web viewing, so I will need to reshoot the image or rework the existing file.  It was also a good suggestion to use an end-on aspect for this as I had indeed used other angles and needed to get away from the trap of being repetitive with such simply shaped subject, so if I reshoot this I will certainly do so with the end-on elevation.  This nagged at me for some while and I eventually decided to take more images as I was not sufficiently happy with the originals to make me want to spend time in CS5 making adjustments.  I also liked the idea of using the end elevation to show some variety, and although the weather prevented me from making this an outdoor shot as I originally intended, this was another reason to re-shoot.  I set up the loaf end on with the two big lights behind at 45 degrees and positioned to give a rim light effect.  This time I used a black background to be different to the wood I used previously and flagged the lights with black card to prevent light from spilling onto the background and illuminating the backdrop.  Camera position was level with the loaf and I underexposed by 2 stops to ensure that the rime lighting effect was maximised.  The result is below.


In Form the view was that all three images I had considered were good but that my tutor’s selection differed from mine.  He felt that my choice of the loaf cut in half may be considered by the assessors to be changing the basic shape of the subject and therefore outside the guide set by the brief.  I’m not going to argue with that so the half loaf goes out and will be replaced by the image where the loaf is stood on it end, having now made the adjustment suggested to take care of “the flat area on which the loaf is standing … is slightly weaker than the first (image) and you might like to lower the brightness a little.” Job done.


Texture generally worked well and there was agreement with my selections (which were actually the images I had put in my final selection on flickr) and that the rather tightly framed side elevation should be rejected in favour of the highly detailed close up.  It was also suggested that I might have considered using the highly structured top of the loaf as the subject for one shot rather than doing both from the side; this is a good suggestion and as I intend to re-shoot one of the Shape shots, I will have a look at the possibilities around this before final submission for assessment (and the folks in Sainsbury’s can give me strange looks again as I pick through the seedy browns for the fourth time to select just the right one !!!!).  

Another day, another loaf.  Yes, more strange looks and the perfect loaf was selected and photographed.  I did this outside to take advantage of the intensely bright day after a sharp overnight frost and set up with the camera looking directly downwards at the top of the loaf while the low sun raked across the surface from the left; I used a small silver reflector to ensure I picked out the detail and texture on the right hand end of the loaf as well.


Colour was well received and the views were … “I applaud your time exposure shot taken by the illumination of six candles.  In my opinion, you have achieved an excellent effect which contrasts sharply with your second image to demonstrate the difference between daylight and an artificial source of candle light.  Because of the candle flames tendency to slight movement, your long exposure has slightly softened the edge of the shadows which is a tiny detail that enhances your image.   You have created the warm glow you will feel after finishing the bottle of Rioja!  This shot also demonstrates the colour of your subject in contrast with the green in the background.    This, the last of the images in this assignment is final proof of the appropriate character of your choice of subject.”

 I am extremely pleased with the above, and especially that the areas I thought showed weakness were the ones that were pulled out, which hopefully means that I am getting to be a better judge, at least of my own material anyway.  I also recognise that I need to think more broadly within the brief, and although I had started to move the subject around more in the latter shots I should have considered the potential for selection of elevation and shooting angle from earlier on.  I took a lot of images in this assignment and looking at them in sequence of shooting I can see the development as I went along, although it is hard to show this in assessment format as I skipped around a lot as ideas for each theme developed.

I am pleased that the blog is apparently easy to navigate and follow, and although there are several things I would not do if I was starting again from scratch, I will refine the structure and some aspects of the format when I start DPP in January with a new blog.

Saturday, 1 December 2012

Thoughts on natural lighting – classic and current


With many thanks to Mitchell Kanashkevic for kind permission to use three of his images.

I’ve been somewhat taken with the possibilities around the control of light, and the RPS portrait lighting course has had a major impact on how I have been thinking about this.  Obviously this is one of the key elements of art and photography as far as portraying the human form is concerned, so I have done a little research into the great practitioners of lighting in art through the ages as well as those in the photographic medium.  However, rather than artificial lighting, I have been considering the use of natural light and the great exponents of this.  I certainly don’t intend to produce a lengthy review of all those who have been claimed by commentators to be the greatest, and there are many, but have singled out two for discussion.
Having recently watched through all eighteen available episodes of Tim Marlow’s excellent Great Artists television series, I focussed on Johannes Vermeer as someone whose use of natural light to capture human form and emotion shows, at least to me, a superbly lifelike quality.  On the photography front a friend suggested to me that I might look at the works of Mitchell Kanashkevic for someone who’s photojournalistic and travel work makes wonderful use of available light to portray people.  I wrote to Kanashkevic and was delighted to get a reply almost by return granting permission to use a couple of his images to illustrate my ramblings.  His website is well worth a look if you like travel photography and stunning use of natural light.

Starting with Vermeer, I think there is an almost ethereal quality to his paintings, and although frequently portraying light from a window to the left of the subject and attracting criticism from some writers for this, the qualities that the light draws from the faces and fabrics is simply stunning.  I have selected three to show here, and firstly chose Girl with a Pearl Earring, painted in 1665, as it is set against an almost black background and the use of the light on the mouth and the earring itself has remarkable vibrance and vitality.  If this was a photograph it would probably have been shot with a light facing the front of the model and a black backdrop to avoid reflecting light onto her back, and a reflector and flags used to selectively light the head scarf.  This has always been one of my favourite paintings simply because of the light, an expression that somehow seems very knowing, and to me shows a connection with the artist that is almost photographic in its quality, remarkable given that it is obviously not a fleeting moment in time as a photograph would be.
Girl with a pearl earring. 1665.  Vermeer

The Geographer shows light on a complete scene, yet the details on the face and clothing is again remarkably picked out by Vermeer as the sun apparently streams through the window; even the up lighting from sun hitting the open map or book can be seen to lift the shadows in the painting of the face.  It shows a remarkable understanding of the how light behaves and it would be fascinating to know the extent to which this was posed in the conditions portrayed and how much was Vermeer’s interpretation and licence.  Photographically the window is being used as large softbox to cast soft, diffuse shadows and the map is utilised in the same way as the large reflectors were used in the model shoot that I posted about earlier.  The Kitchen Maid, painted in 1660, was selected as there was appeal in the way that the light is graduated from the bottom left to the top right of the image as the natural light comes in through the window, picking out both the food items on the table and facial features of the maid herself.  Not unusually for Vermeer, there is a significant empty space lit to the right hand side of the painting against which the primary subject is framed.

The Geographer. 1668. Vermeer

The Kitchen Maid. 1660.  Vermeer

Moving on to Kanashkevic and his naturally lit travel photographs, my first image is Sulfur miner, Ijen Crater, East Java, Indonesia.  2008 and was actually the image that started me thinking in the direction that led to my candle light shot in the Light assignment.  There is a lot on  his website about the setting up of this image and how long it took to get the lighting right with the guttering torch and the departing figure in the background, but it captures the wind by the direction of the flame and the light falling perfectly on the face, clothes and baskets;  the cigarette burning in his hand in my view adds to the image and the early morning light has also just picked out the miner heading down the slope, separated from the primary subject by the mountain silhouette in the background.
Old orthodox Russian priest and his wife, Braslav region, Belarus, 2009 was a photograph that captured a face with a history and the lighting from the window on the left hitting the face and arm was similar to the lighting in some of the Vermeer paintings in its intensity and quality.  I appreciate that this is a well worked lighting device employed by a million photographers and artists but me for there are strong parallels here.  I like the way that the light just catches the face of the priest’s wife in the background, although she is clearly a peripheral figure in the photograph, and may well have also been in reality.  Lastly, Tea maker’s son, Rajasthan, India, 2007 struck me because of the strong and harsh directional lighting and shadow depth as the sun streams through the entrance to the area in which the child is sitting.  The powerful natural light overpowers the light that must be coming from the fire and restricts it to just the orange glow from the inside of the oven, which along with the steam rising from the pot, makes it a warm image in spite of the harsh and almost cold and bluish lighting from the right .  The catch lights in the eyes make this picture for me as without these the child’s face would seem lifeless and dull.

Sulfur miner, Ijen Crater, East Java, Indonesia.  2008 
Copyright Mitchell Kanashkevic.  Used with kind permission.

Old orthodox Russian priest and his wife, Braslav region, Belarus. 2009
Copyright Mitchell Kanashkevic. Used with kind permission

Tea maker's son, Rajasthan, India. 2007
Copyright Mitchell Kanashkevic. Used with kind permission

Although I could write reams on natural light in painting and photography, and indeed there are many thousands of comparisons available to read, coupled with millions of images, I felt it was a worthwhile endeavour to highlight a couple of examples which had particular personal appeal as I think that both have relevance to the Light module and expand a little on what I learnt on the RPS workshop.

Thursday, 22 November 2012

ASSIGNMENT 4 Applying lighting techniques

I have spent a number of sessions playing with lights and loaves and experimenting with flash, grids, snoots, gobos, flags, small and large constant lights, candle light and natural light outside as well as various reflectors and diffusers.  I have had a great time exploring this as it is not an area of photography where I have any previous significant experience and the learning curve has been steep and profitable.  In the end I felt quite comfortable that I could set up lights and modifiers to get the effects I wanted, especially using the constant lights, and it soon became clear that the larger lights were a far better option, and with 1300 watts burning away, things were just that much easier to set up.  I thought the loaf was ultimately a good choice as it had such pronounced shape and texture with it block shape and fine irregularities on the surface.  I also tried as I went along to add a few more aspects to the shots, so introduced some simple props that I thought fitted the situation, like the wine in the candlelit shot and the knife in the shot where I eventually chopped the loaf in half (it was almost fossilised by then).

Shape
The technical details of these images are described in a previous log post, so this is all about the selected images I intend to put forward for assessment.  The first ‘shape’ shot was taken indoors and the lighting was set up such that he loaf was almost in silhouette and the background was well lit to provide a contrast with the darkness of the bread.  I felt that this worked very well as only the outline of the loaf was clearly defined, yet the identity of the subject was clear.  The second shot for ‘shape’ was taken outdoors and I wanted to try and use a rim light effect in this case such that I could show the dark loaf against a dark background – obviously only possible if the edges were picked out by the light.  A low sun and some precise deployment of gobos and flags got the effect I was after, very much aided by the shiny and baked top of the loaf catching the rays of the sun.


Shape (artificial light)
Shape (natural light)

Form
Form’ is all about the volume or 3D aspect of a subject and I felt needed a higher camera angle and a single light left and level, with a reflector deployed front and right to add different degrees of fill until I felt I had achieved the effect I was after without knocking out the shadow detail under the loaf.  I shot an alternative to this as I thought the loaf stood on its end might be better to demonstrate the 3D effect I was after.  This was again lit from the side and left with the reflector front and right used to adjust the shadow so it was not too dark, but without taking out the shadow that created the effect of volume.  Although both do the job, I think the upright shot of the loaf is better as it uses three of the flat sides and accentuated the 3D effect.

The last shot for ‘form’ took a different approach and in this instance I cut the loaf in half and used a reflector to put light onto the left hand half and used the reflection from the knife to just lift the shadow on the right hand half (I was surprised this worked as well as it did, but the knife does have quite a large silver and shiny surface area.
Rejected :  Form (artificial light)
Selected :  Form (artificial light)
Form (natural light)
Texture
 
I agonised over the selection of the final image here for some considerable time.  I decided early on that the shot with the flash and the snoot plus flag that I took with the 70-200mm lens at a focal length of 200mm was the one I wanted to go with, but what sort of crop was most appropriate?  Given that I wanted to accentuate detail in the image I eventually decided to go with the crop that showed the most detailed part of the photograph where the small and hard shadows were at their most acute and there was no distraction of background or surroundings.  I chose the second shot from the outdoor series where I had set up a series of gobos and flags to restrict access of light to the loaf in quite an extreme manner, with just a slice of the low and harsh sunlight raking across the face of the loaf.  Given the cloudless sky, the sun represented a small and hard light source and the angle the bread was presented to the light really pulled out the sharp detail on the top and front.

Rejected :  Texture (artificial light)
Selected :  Texture (artificial light)
Texture (natural light)

Colour
I wanted to do this without recourse to Photoshop, so chose to go with the photographs taken indoors in candle light and outdoors in the sun.  The candle light shot was lit entirely with six candles and required an exposure of 90 seconds, but it did deliver a richly coloured image which brought out the warmth in the scene. The outdoor shot was taken quite early in the day when there is more orange in the light and again the choice of light source and direction brought colour and warmth to the loaf.

Colour (artificial light)
Colour (natural light)
So, that’s the end of Light and Assessment 4, at least until I get tutor feedback anyway.  I learnt more from this unit and building towards the assessment images than I did from any other part of the course so far.  I had done very little indoor work at all until this point and the topics explored were new to me as I explained in the introduction to this piece.  Some things were frustrating, especially the demonstration of form, which I originally felt should have been the easiest to demonstrate.  With the loaf as the subject of the assessment, it had such an obvious 3D structure that regardless of how it was shot I always felt it showed ‘form’ whenever it was photographed in full light.

Texture’ and ‘Shape’ were the most satisfying elements for me as it was possible to create such massive changes in the way the subject was lit with relatively small and subtle changes in the positions and angles of the various light modifiers.  I got a lot out of this and it is certainly an aspect of lighting that I plan to use more in my other photography rather than just being satisfied by subjects that were ‘nicely’ lit.  Light, Science and Magic was a great companion text to Light, as was Syl Arena’s Speedliter’s Handbook, both for the lighting setup diagrams and for the Canon specific guidance when using flash.  Other sources worthy of note are the Strobist blog and the lightingmods blog as well.

I have written a separate post about this, but I attended a two day Royal Photographic Society workshop on studio lighting which was tutored by Chris Burfoot.  This was an outstanding couple of days and all the concepts that I have working on during the Light module were covered, but with respect to studio photography.  Oh how wonderful it would be to have the huge Broncolor studio flashes and a Hasselblad medium format camera to use like we did on the course ….  rather over the top for a loaf of bread I guess …

Wednesday, 21 November 2012

Lighting studio portraits - the pro way ..

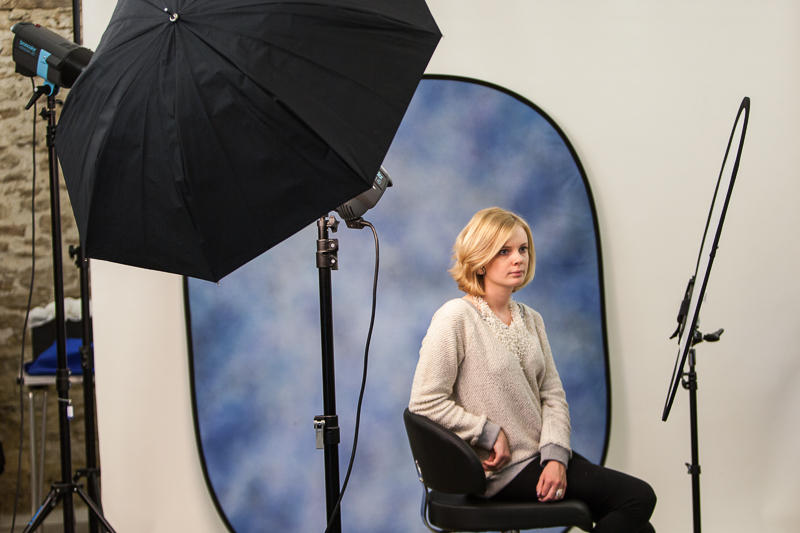
As part of my developing interest and understanding of light, I have recently been on a two day studio portrait photography workshop booked through the Royal Photographic Society and tutored by Chris Burfoot.  I have mentioned in a number of posts before that the Light module was the first time that I have really made any great effort to take photographs inside and get a grip of the lighting requirements to do so effectively, so this seemed an ideal opportunity to get some tuition in the area of portraiture and also to try out some top end professional kit instead of my pieces of silver foil, cardboard reflectors and tracing paper…..  The kit used throughout was Broncolor flash, which is as good as it gets, Lastolite reflectors, and a Hasselblad camera was available to borrow to see just what image quality can really look like (I thought my 5DMkII was good, but the H40D produces images from another world).

The course is based on flash and the pro studio units generate lighting like the surface of the sun compared to my two constant lights or Canon Speedlites.  The two days were so good because they generally covered the same aspects of lighting as are in the OCA light module and there was some commonality in approach as form, shape, colour and texture were emphasised throughout.  We started off with a simple single light setup, then introduced a reflector, then two lights, hair lights etc. and covered the lighting options as listed below.  We also worked with coloured, black and white backgrounds.
Cameras were used exclusively in manual mode and exposures set by use of flashmeter readings and adjusted with the controls on the flash heads, and of course I have to mention the endless patience of the model who smiled and posed for hours over the weekend.  One of the most valuable lessons for me was in the placement of reflectors and I was surprised how close these actually were to the model.  Given the massive light output of the flashes the reflector panels were often only 30cm or so from the model’s face, and that surprised me, but the panels are huge and made for a wonderful large source and therefore soft lighting, ideal for portraiture.

Front light + reflector + hair light with snoot + blue background
Taken with the above set up
Front lighting + reflector just under the hand
Front light high and pointing right down + triple reflector just below frame.  You can see the multiple catchlights in the eyes

There was a lot of other information discussed around the business of portrait photography and I picked up some websites to see how the pros do it.  So if you want to hire a fully serviced studio big enough to photograph a double decker bus have a look at BigSky London, and to see some amazing top end work that’s a bit different, try Ben McDade and Tim Flach.
  • Flash or Continuous light - advantages and disadvantages.
  • How a studio flash works.
  • Setting up a portrait with a single light.
  • Changing the quality of the light with simple accessories.
  • Placing the main light. Using a simple reflector.
  • Using a flash meter and setting your camera.
  • Adding a second light.
  • Light control accessories.
  • Hair/background lights.
  • Getting more depth into your portraits.
  • Using a main and fill light.
  • Balancing light sources with a flashmeter.
  • Lighting a white background - not lighting a black one!
  • Softboxes - stunning portraits with a small softbox.
  • Positioning lights and subjects.
  • The inverse square law

  • Using larger softboxes to create lovely soft lighting.
  • Hard, high contrast lighting. Mixing hard and soft light together.
  • Lighting for full length. The white background, for children and contemporary portraiture.
  • Camera viewpoint.
  • Using a lightbank as a huge soft light.

Friday, 16 November 2012

Exercise 31 Light through the day


The objective of this exercise was to investigate what happened as the sun moved throughout the day and the quality of the light changed in response to the angle of incidence.  The scenario specified in the study notes was to find a landscape where there was a broad view and one where the sun would impact upon it throughout the day.  The plan was then to photograph the scene at approximately hourly intervals from the same place, obviously so each image was exactly the same with the only variable being the light.
I did not feel I had the time to wait for an infinitely clear day, nor the opportunity to return to the same spot a dozen times, so opted for a slightly different strategy which I felt worked out well.  If time and opportunity were unlimited I would have set the camera on a tripod aimed at a classic landscape (whatever that is ..) and used my interval timer to take a series of images at specified time points.  I was not prepared to leave the camera set up anywhere (if you stand still for too long where I live you will have your pockets emptied, so no hope for a camera remaining anywhere), therefore I opted for some shots in the garden as the sun moved round over the course of the day.  To get a range of images I did this over a couple of weekends to get different light and avoid the endless rain and clouds, although the changes in weather conditions made this more interesting than I was expecting it to be.  All photographs were taken with a Canon 5DMkII with a 24-105mm f/4 L IS zoom lens set at 24mm attached.  I also used a Lee 0.3ND soft grad filter with transition area of the filter set along the tree line to make something of the sky as most shots were taken shooting into the sun.

My first shot was taken at about 08.30 with the sun beginning to emerge over the trees to the left.  The low light angle picked out part of the garden and as the direct and un-obscured sun represents a small light source, I saw hard shadows and a lot of contrast in the grass area that was illuminated.  The second image was taken at 09.20 a week later (so slightly different in terms of comparative time between the two sessions), and this was a frosty day and with an equally clear sky.  The reflection from the white frost on the ground made a marked difference and scattered more light (obvious in the originals and in the shutter speed, which was a whole stop faster); the cloudless sky again gave me harsh and well defined shadows.  The third shot was taken at 10.00 when the sun had climbed above the line of the trees and was illuminating far more of the scene and shining directly towards the camera.  The higher light source was throwing shorter shadows than previously and the scene appeared to me to be flat and rather uninteresting compared to the earlier times where the light angle had created more contrast and made more interesting detail and structure in the image.

08.30
 
09.20
10.00

Next was 10.50 and I’m aiming straight at the sun.  The shadow detail in the trees in the distance has gone and they have been thrown largely into silhouette, although much of the foreground detail is picked out quite harshly by the angle of light.  The sun hitting the front of the lens has caused some flare and the image is generally lacking in sharp detail.  The next shot is 11.40 and there is cloud, which has caused the sunlight to go from being a small light source to a large and well diffused one.  The soft light has wrapped around the objects in the scene and the shadows have gone, making the image flat and uninteresting (not that my garden is interesting anyway, but hopefully you get the point …).  12.25 was my next timing and although the clouds are still with us, there are some breaks which made the scene rather brighter and added some colour and texture to the yellows in the leaves on the apple trees.
10.50
11.40
12.25

It’s now 13.20 and the sun has deigned to make an appearance, this time from the right of the image.  The angle of incident light is now throwing some quite long shadows and the side of the house is also in shadow, so there is no longer any reflected light from the white render.  Details in the grass and pebbles are sharp and harsh as the light angle picks out the details. At 14.35 the lower sun dropping behind the house is throwing a longer shadow across the grass and really lighting up the apple trees and bringing out the best of the leaves that had been largely in shadow up until then.  The partial cloud cover was also providing some diffuse light which was helping the foreground detail.
By 15.45 the light was beginning to fall as the sun by now had just about disappeared behind adjacent buildings; a wheelbarrow has also magically appeared in the scene ..  Only the tops of the trees were now catching the light and rest of the scene had lost lots contrast and detail.

My favourite shot was the penultimate one taken at 14.35 and I liked this because of the richness of colour introduced by the low sun angle and the fill that came from the diffuse light provided by the clouds.  The second shot in the sequence, which was obviously from the frosty morning pictures, I thought had more atmosphere to it and it really feels like a chilly morning with the sun’s rays defined by the mist, but the lack of colour gave it less appeal I felt.

13.20
14.35
15.45

There was a lot to be learned from this exercise and it could be argued that it might have been better placed later in the sequence of exercises as a number of aspects that cropped up in the artificial lighting exercises are pertinent to outside natural lighting as well.  Just as well I did these out of order then!  Although I went away from the guidelines of the brief in order to get this completed I felt this was ultimately more beneficial than just setting up the camera and interval timer somewhere and leaving it to run for the day, which would have been the alternative, as I just don’t have the time to sit around for the hours of daylight!  The varying light and weather that occurred throughout the two days I conducted this gave me more to consider in the images than I believe would have been apparent from a perfect blue sunny day from start to finish, although that would have been a good option if I was shooting a traditional type of landscape shot.